A Step-by-Step Guide to Changing Your Home’s Drain Trap
The plumbing system in your home plays an important role in having a healthy and functional living space. But, over time, wear and tear can take a toll on various components, including your home’s drain trap. And, a leaking or damaged drain trap can lead to unpleasant odors and water damage. So, make it a point to address the issue asap. The Florida Plumbing Association of PHHC offers event on dealing with plumbing issues. But, for today, the experts at Billy the Sunshine Plumber guide you through the process of changing your home’s drain trap, empowering you to tackle this DIY project with confidence.
Materials Needed:
- Adjustable wrench
- Pipe cutter or hacksaw
- Plunger
- Plumber’s tape
- New drain trap kit
- Bucket or basin
- Towels or rags
Step 1: Turn Off the Water Supply And Clear the Area
Before starting any plumbing project, it’s crucial to turn off the water supply to the affected area. To do this, locate the shut-off valve under the sink and turn it clockwise until it’s fully closed. If there isn’t a dedicated shut-off valve for the sink, you may need to shut off the main water supply to your home. Then, remove any items stored under the sink and place a bucket or basin beneath the drain trap to catch any water that may spill during the process. Also, having towels or rags on hand is also helpful for keeping the work area dry.
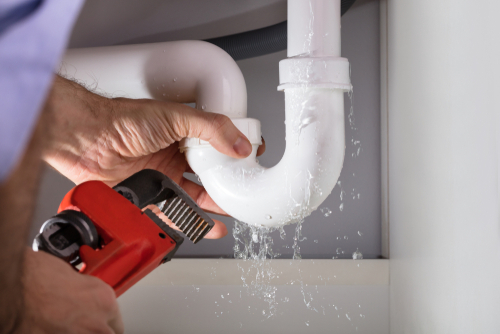
Step 2: Loosen the Connections and Remove the Old Trap
Using an adjustable wrench, loosen the slip nuts that connect the drain trap to the sink tailpiece and the waste pipe. Be prepared for some water to drain out, so ensure your bucket or basin is positioned correctly to catch it. Then, carefully detach the old drain trap from the sink tailpiece and waste pipe. If the trap is stubborn, use a plunger to create suction and help break the seal. Once removed, inspect the trap for any signs of damage or wear.
Step 3: Measure, Cut and Install the New Trap
Measure the length of the old trap to determine the size of the new one. Then, use a pipe cutter or hacksaw to cut the new trap to the appropriate length. This will ensure a snug fit between the sink tailpiece and the waste pipe. After you’ve measured and cut, then slide the slip nuts onto the new drain trap, ensuring the rubber washers are in place. Then, connect the trap to the sink tailpiece and waste pipe, hand-tightening the slip nuts initially. Use an adjustable wrench to secure the connections. But, be careful not to overtighten and risk damaging the pipes.
Step 4: Check for Leaks
Turn on the water supply and carefully inspect the connections for any signs of leaks. And, if you notice any, tighten the slip nuts as needed. Then, wipe away any excess water with a towel or rag.
Not sure you want to attempt to change your home’s drain trap on your own? No worries, just call Billy the Sunshine Plumber.
If you ever feel uncertain or encounter unexpected challenges, don’t hesitate to consult with the plumbing professionals at Billy the Sunshine plumber for assistance. Billy the Sunshine Plumber has been the Tampa Bay 24-hour plumber of choice since 1924 when he first opened for business. Billy the Sunshine Plumber is open 24/7/365 in Pinellas, Pasco, Hernando and Citrus counties. Days, nights, weekends, or holidays, Billy the Sunshine Plumber is always here for you.
Billy the Sunshine Plumber | I Need a Plumber | 24-Hour Plumber | Plumber Near Me | Plumber | Water Heater | Drain Cleaning | Local Plumber | Condo Plumber
#BillytheSunshinePlumber #INeedaPlumber #PlumberNearMe #Plumber #WaterHeater #DrainCleaning #24HourPlumber #LocalPlumber #LowWaterPressure #CondoPlumbing
